This guide assumes you have already read/completed the previous tutorials.
File list
| File Link | Description |
|---|---|
| End Result | The end product of this tutorial for you to examine and compare. |
Introduction
In this section, we will cover how to create a basic physics model for our custom platform, look at making it a .crate tag, as well as go over the differences between collision models and physics models to clear up any confusion.
The goal of the following tutorial is to make a .crate tag for our custom platform, so that you can learn the difference between the tag types.
Collision vs physics
In the Blam! engine, collision models and physics models are used to handle different types of "collisions". Both types are generally highly simplified 3D meshes of the render model, as using the render model would be too computationally expensive.
Physics models are used by the Havok engine to manage environment collisions and most player collisions, and are required for certain types of tags to function, such as .vehicle and .crate tags. For example, a physics model is what allows a .vehicle to sit on or crash into the environment, or a .crate to fall dynamically and roll around.
Collision models are mainly used to handle projectile collisions - you will not be able to shoot a model in-game if it does not have a collision model, the projectiles will simply pass right through. An edge case here is that collision models can be used as a stand-in for a physics model in the case of static tags such as .scenery, allowing for players to collide with the model even without a physics model. This is where some confusion can arise.
Physics models are typically much less complex than collision models, for several reasons. First, the physics model doesn't need to be completely accurate, as it is invisible and most players won't be able to tell. Secondly, calculating physics can be expensive (less so on modern PCs, but definitely on the X360), so the more basic the better. Finally, physics models must be made of strictly-convex shapes only, which limits how easily they can be made to fit the model perfectly. Don't worry if you don't understand what this means, it will be covered later.
On the other hand, collision models are usually a much closer representation of the render model. This is because players will find it odd if projectiles don't seem to collide with the visual model and the shapes do not need to follow strictly-convex rules. See the following pictures for a visual idea of how the two differ.
TL;DR - Physics models are used for player and environment interaction, collision models are for projectile collisions.
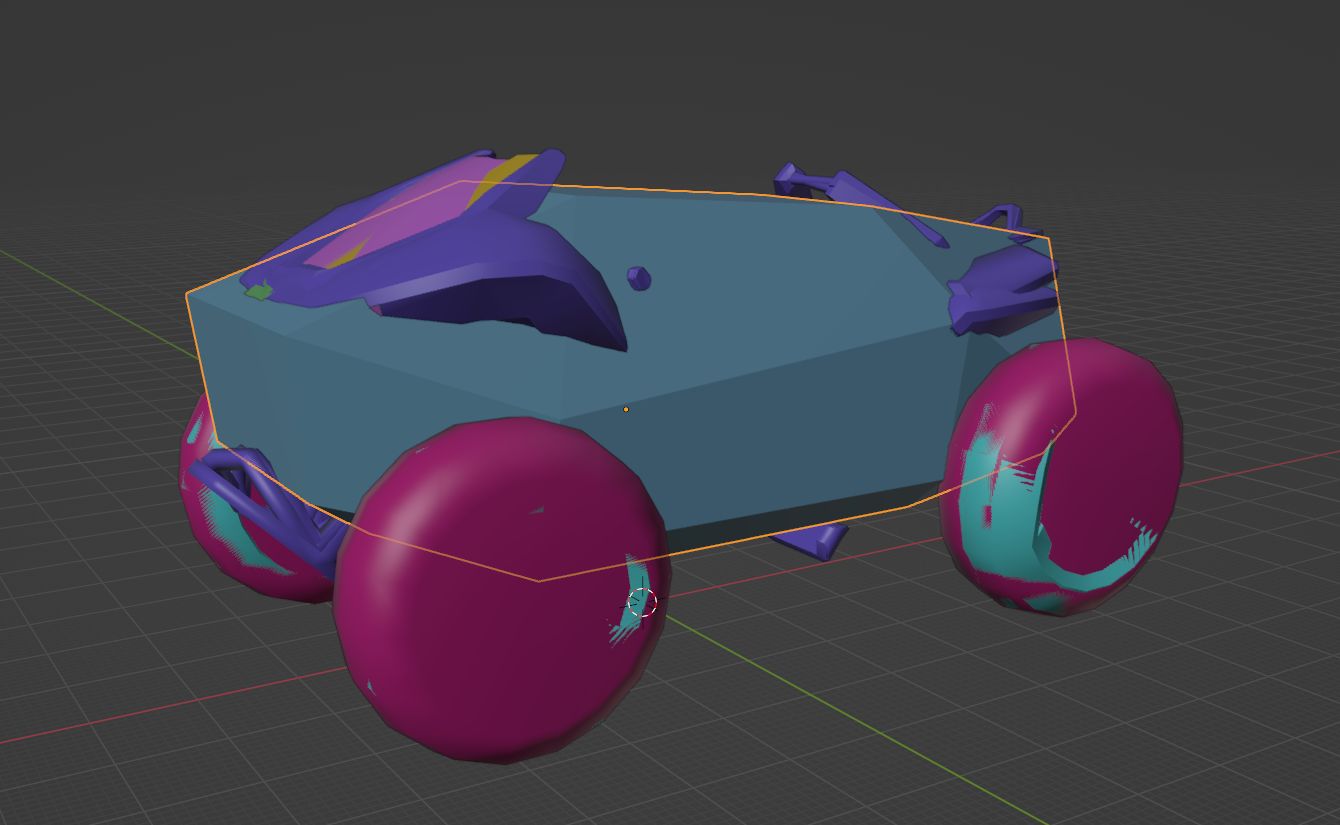
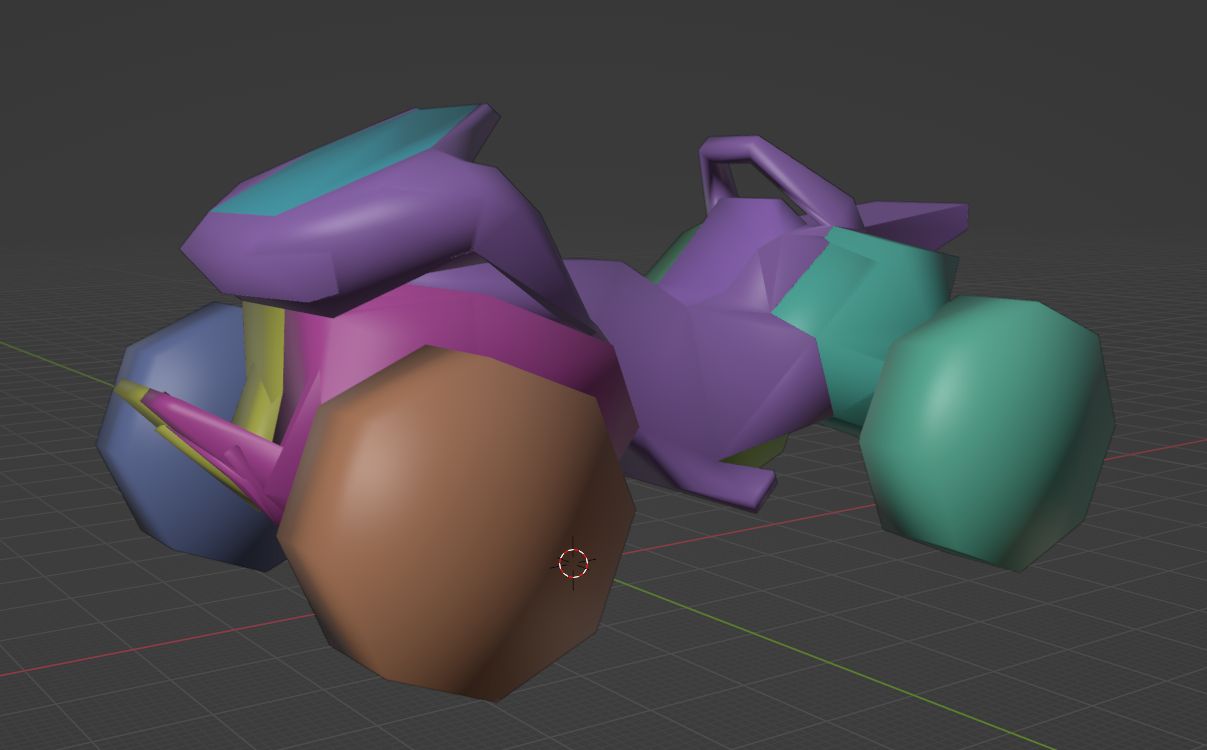
Example mongoose collision and physics models
Physics model of the mongoose. Note how it is strictly-convex. Physics (highlighted) overlayed on the render model. Note how much less complex the physics model is. Collision model of the mongoose. Note how it is still low-poly, but much more complex than the physics model. It also does not need to be strictly-convex.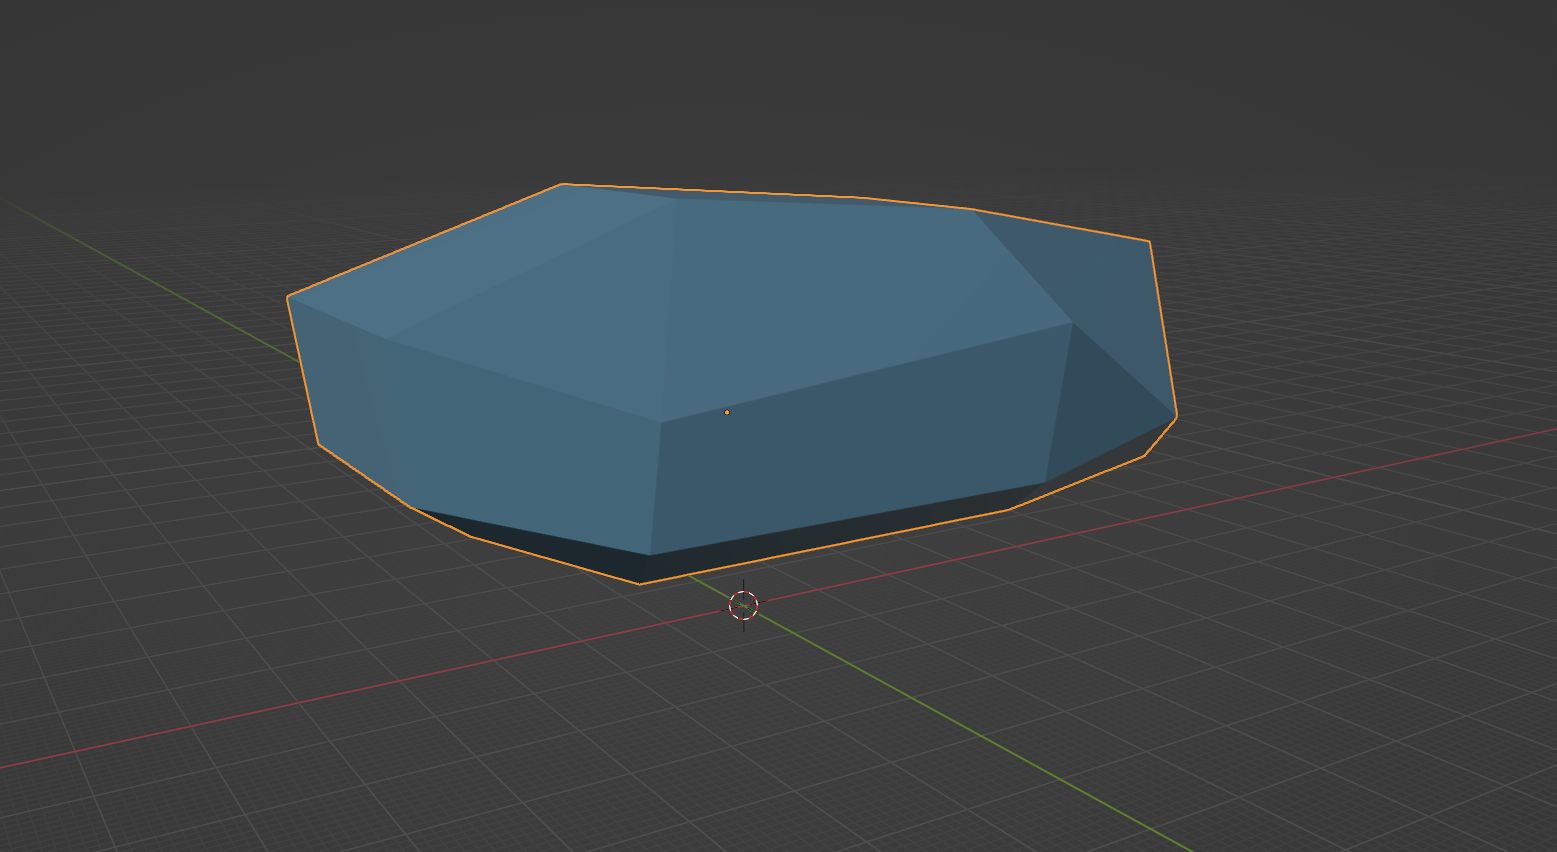
Creating the crate tag
- Open Guerilla.
- Press Ctrl+N or
File -> New. - Type
crate, or find it in the list. PressOk. - A new
.cratetag will open. Press Ctrl+S orFile -> Save. Navigate to ourcustom_platformfolder inH3EK\tags\objects\scenery\custom_platform. Name the filecustom_plaftorm, and hitSave. - In the tag, set the
bounding radiusto 3. Next, press the...next to themodelbox and choose ourcustom_platform.model. Save the tag.
We've now successfully made a .crate tag for our platform! I wonder what will happen when we try to spawn it in...
- Open a scenario in Sapien.
- In the
Hierarchy View, navigate toScenario -> Objects -> Cratesand select the folder. - Click
Edit Types, clickAdd. - Navigate to our custom platform folder, and double click the new
.cratetag we made. - Click
Done, and thenOkto close the dialog. - Right click on the ground in the
Game Windowto place a new crate object - In the
Properties Palette, change theTypetocustom_platform
...Oh dear, we seem to have an error! You should see an error that reads:WARNING objects: Could not construct crate object. Make sure you have a model and physics model linked up to the object definition for (crate custom_platform)-FATAL- objects: (CHECK WARNINGS: object_type_new failed) error creating custom_platform
If you were paying attention in this section earlier, you may already realise the issue - .crate tags require a physics model in order to be spawned, similarly to .vehicle tags.
Making a physics model
Making a basic physics model, especially for a render model as simple as our platform, is actually quite straightforward. In the following steps we will add a basic cuboid to act as a physics mesh for our model. We will also edit our render model to be a bit thicker, as I think it will help demonstrate things better down the line.
- Open your Blender file from the last tutorial, or download the end result from the previous page.
- Select the platform object.
- Press S to scale, press Z for Z-axis only, and then press 3 to make the platform thrice as thick. Press Left Click or Enter to confirm.
The platform should now be three times as thick. Looks better already!
Now that the render model edit is out of the way, let's move on to making the physics object:
- Press Shift+A to open the Add menu, then select
Mesh, then clickCube. This will add a new cube object to the blend scene. - Before anything else, we should parent the cube to the Armature. Failure to do so will mean the cube won't get exported! In the
Outliner, click the cube object to make sure it's selected, then click on theArmatureobject whilst holding Ctrl. - Now, with your mouse over the
3D view(not theOutliner), press Ctrl+P to open theParentingmenu. Now clickObject (Keep Transform). The new cube object should now appear with the same indentation (hierarchy) as the render model in theOutliner. Here is a gif demonstrating the process: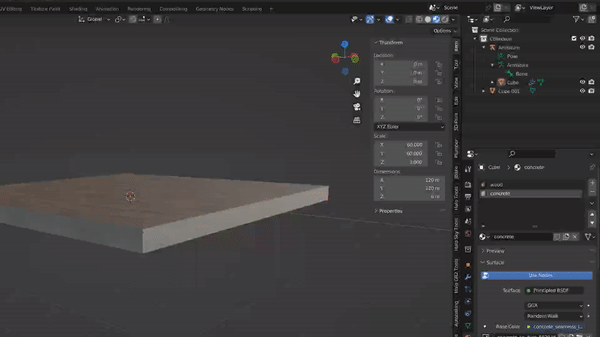
Parenting the new cube object to the Armature.
- Double click the new cube object, or press F2 with it selected, to be able to change its name. Name the object starting with a $, the rest of the name is up to you but I will name it
$platform_physicsto keep things simple.The Blender addon looks for certain symbols in object names to determine what type of object they should be treated as. Here, the
$symbol denotes that this is a physics mesh, and should only be exported into the physics model. Without this symbol, it would be exported as part of the render model instead. - For clarity's sake, I will rename the render model object to
platformas well, but this step is optional.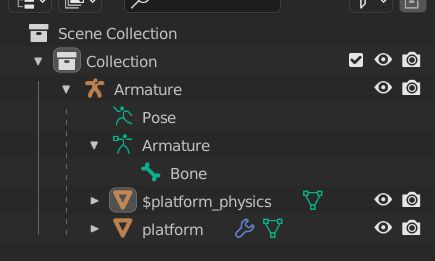
Your Outliner view should now look something like this.
- The next step is to make the physics model big enough to roughly match the render model. Select your physics object, then press S, followed by Shift+Z, then 59.5. Now hit left click or Enter. The physics object is now almost as wide and long as the render model.
- Next, press S, then Z, then 2.9 to make it the right height too. You may have noticed this isn't quite as big as the render model. This is personal preference, but I typically make physics models slightly smaller than the object they represent to allow the player to feel like they can get as naturally close to the object as they should be able to.
- Finally, we need to add a material to the physics model. This does not need to be a halo shader name, it can be anything but you might like to match it to a global material such as
hard_metal_thick. Select the physics object, and switch to theMaterial Propertiestab.Physics models must always have a material applied to them or you will experience a crash when importing the physics model. If you ever see the following crash, not having a material on the physics model is the cause:
-FATAL- ### ASSERTION FAILED: at e:\jenkins\workspace\mcch3code-release\mcc\release\h3\source\memory\array.cpp,#264
-FATAL- index>=0 && index<array->count - Click
New. Double click or press F2 to rename the material to your liking. I will name ittough_organic_woodas the platform is wooden.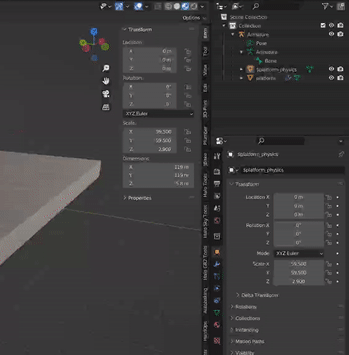
An example of adding the material, in case you need help.
That's about all there is to making a very basic physics model!
Exporting
If you're already comfortable exporting models from blender for Halo, the physics .JMS file simply needs to be put into the physics folder. If you aren't, follow these steps:
- In Blender, select File -> Export -> Halo Jointed Model Skeleton (.jms)
- When the dialog box appears, navigate to your
custom_platformfolder indata, e.g.H3EK\data\objects\scenery\custom_platform - Make a new folder called
physics. It should be in the same place as yourrenderfolder. Enter into this folder. - Make sure to set the game version to
H3 MCC, and set the Mask Options to only haveHidden,Non-RenderandPhysicsticked. - Leave all other settings default, name the file
custom_platform, and hitExport JMS.
Importing
This process will be very similar to importing the render model we did in a previous tutorial. See here if you need to re-read how to use Tool in CMD.
With CMD open in the H3EK folder, you only need to type one command to import the physics. The exact parameter of the command will differ depending on where you saved your JMS. In the case that you have been following along exactly, the JMS is in H3EK\data\objects\scenery\custom_platform\physics. The Tool command only needs the path after the data folder, to the folder that contains the physics folder. So in this case it would be objects\scenery\custom_platform
The full Tool command you need to type in this case would be: tool physics objects\scenery\custom_
If you have spaces in your filepath, e.g. objects\scenery\my stuff\platform, don't forget to wrap your path in quotation marks "
Getting up and running
If all the previous steps have gone well, you should now have a new .physics_model tag in H3EK\tags\objects\scenery\custom_platform. The very final step of the process, and an important one not to forget, is to reference this new tag in the .model tag of the object!
- Open Guerilla
- Open your
.modeltag, likely inobjects\scenery\custom_platform - Near the top, look for the
physics_modelbox just below therender_modelreference. Click the... - Select the new
.physics_modeltag - Save the tag. Done!
With that, your platform scenery object should now be player-collidable. Check it out in Sapien! After you've made sure that is working, try to re-place the .crate version using the same steps from earlier. If everything is working, you should notice that the object falls to the ground in dynamic fashion! This is the key difference between scenery and crate tags - scenery is purely static, usually decorative objects, whereas crates are dynamic, well, crates (and barrels, and boxes, and anything else that you want to be moved by the player, guns, explosions, etc).
Demonstration of both the scenery and crate tags.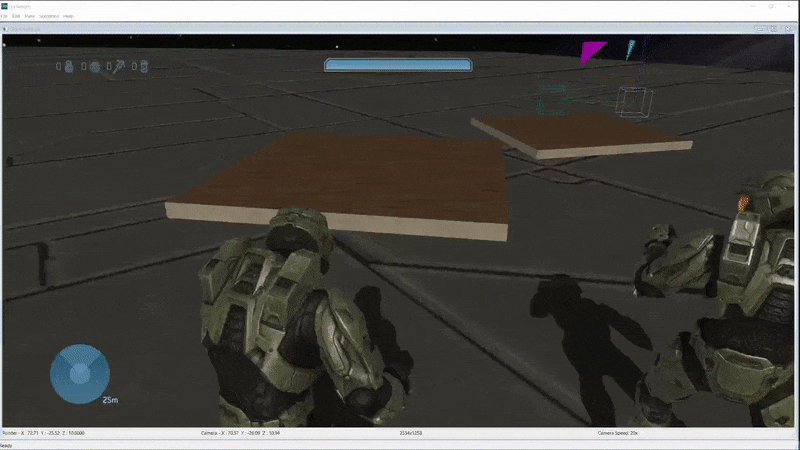
Strictly convex explanation
In the Halo engines, presumably to save on resources physics models have a restriction where each shape used can only be convex, with no concave surfaces. If you are unfamiliar with 3D geometry, this can be a little tricky to get your head around at first, but with the help of a diagram and example it should become easier to grasp.
Firstly, one of the best ways to determine if a shape is strictly convex is to draw a line through it. If the line passes through more than two edges/faces, then the shape is not strictly convex. See the following very crudely drawn diagram as an example: Example of strictly-convex vs non-strictly-convex shape in 2D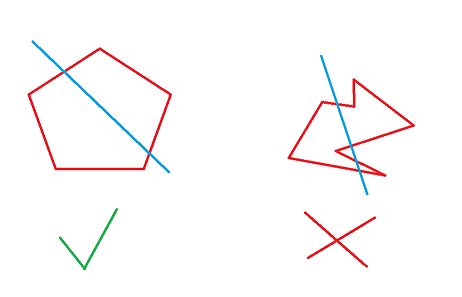
Blender has a built-in function that can be used to determine if the 3D mesh you have made is strictly-convex or not - the Convex Hull tool. Here's an example of how to use it:
- Create some 3D shape in Blender.
- Select the object, and press TAB to enter into
Edit Mode. - Press A to make sure that all vertices are selected.
- Along the top bar, click
Mesh, thenConvex Hull. - Blender will force your 3D mesh to be strictly-convex. If the model changed at all, it will need editing to be strictly-convex (or you can use Blender's convex hulled version). If it didn't change, the congratulations your shape is strictly-convex and will work well as a physics model!
If any of your physics shapes are not strictly-convex, the Blender addon will still export them, and Tool will not complain when you import the physics model. However, during import, Tool will run a process similar to Blender's Convex Hull where it will force the shape(s) to be convex. It can be difficult to notice as it isn't visible, but the object's physics model will feel wrong to collide with in areas that Tool has re-arranged.
Make a concave object strictly-convex with Blender's Convex Hull function.
Once you've gotten to this point, you are ready to look at adding a custom animation and creating a .device_machine tag, so that we can have the platform move us around! This next section is available here
Acknowledgements
Thanks to the following individuals for their research or contributions to this topic:
- PepperMan (Writing this guide)