Guide to the Import Sidecars Task
The import Sidecars task is designed to handle all the tedious parts of importing assets to Halo Reach using the new import pipeline. It is able to to:
Batch convert all .fbx files for an asset to .gr2 format (or optionally one or a selection of files using the FBX button) in one click.
Generate a working sidecar using the minimum possible user input
Use the generated sidecar to import assets into the game
Do all of the above in one click
Anatomy of a task
The Osoyoos Import Sidecar page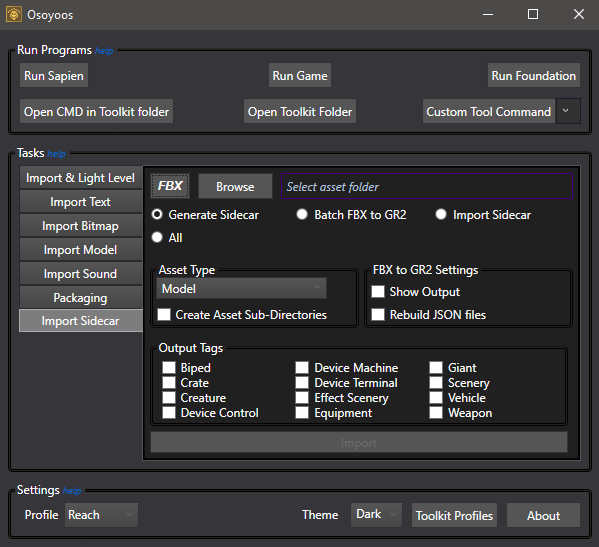
Browse Asset Folder: Use this to select the root folder of your asset. This is the folder where the sidecar will be saved, and where you can add sub-directories to store intermediate files (e.g. levels\solo\m10).
FBX button: Use this to select one or multiple .fbx files for conversion to .gr2 format. This button will use any settings we've enabled in the FBX to GR2 Settings.
Radio Buttons: Use these to select which process to run when "Import" is clicked. Using "All" runs all processes in the following order: Batch FBX-to-GR2, Generate Sidecar, Import Sidecar.
Asset Type: Use this to select what kind of sidecar to create: model, scenario, decorator set, or particle model. The "Create Asset Sub-Directories" tickbox when enabled will create a valid set of sub-directories within the asset folder based on the asset type selected. These options will be available if either Generate Sidecar or All is selected.
FBX to GR2 Settings: There are two checkboxes here. By default the fbx-to-gr2 windows will be automatically closed after completing their task. Enabling Show Output will keep the windows open. Rebuild JSON will instruct Tool to rebuild JSON files it encounters. These settings apply to both batch FBX-to-GR2 and the FBX button.
Output tags. This section is only available when either Generate Sidecar or All is selected and the asset type is set to model. At least one output tag must be selected for a model otherwise sidecar generation will abort (this is to avoid creating sidecars which would fail on import).
Import button: Click this executes the selected process with all the parameters chosen.
Example - Importing a box model into Reach
Select the Import Sidecar task in Osoyoos (if this is greyed out, you haven't assigned the current profile to Reach). Generate Sidecar will be selected by default. Under Asset Type ensure model is chosen in the dropdown and select the Create Asset Sub-Directories checkbox (this will generate a valid set of sub-folders for later use.)
Select the output tags you wish to create. At a minimum you should select the Crate output tag for this asset.
Next navigate to any path within your data directory and add a folder called box. Or simply type out the path in the text box e.g. objects\test\box
Hit the import button. If successful, a pop up will appear to confirm a sidecar.xml was created. Navigate to the asset in file browser. Find box.sidecar.xml. In this folder you should see the following folders: render, collision, physics, animations, markers, skelton. If not, rerun the above steps and ensure you have check Create Asset Sub-Directories.
Open up blender or your 3d program of choice and place a cube. Scale this up to roughly half the size of Masterchief (scale models come with the Halo Blender Toolkit). Ensure you apply the scale after scaling. Do this in blender by selecting the object and pressing ctrl+A and then clicking Apply Scale.
Duplicate the cube twice. Add the prefix @ to one of the names, and $ to the other. You should now have three cubes which will handle the render model, collision model, and physics model of our box.
Set the material of the render model cube object to "green" (i.e the cube without a prefix in its name).
Export the render model cube to fbx. It is important that in the export settings you set the fbx scale to FBX local units, otherwise the scale will be off in game. Save this to the box\render folder and name it default (the name will be used as the permutation of the object).
Repeat the same process for the collision and physics model cubes. Except saving them to the collision and physics folders respectively.
Return to Osoyoos and select Batch FBX to GR2 and then hit import. Tool will process each .fbx file and spit out some JSON and GR2 files.
Materials are not automatically written to JSONs currently, therefore we'll need to edit the default.json in the box\render folder.
Open this file and navigate to the material properties section. The bungie_
shader_ path will point to the invalid shader. Replace this entry with levels\shared\shaders\simple\green or any other shader you prefer (ensure you use double back slashes in the JSON for file paths). Save the file. We'll need to recreate the box\render\default.gr2 in order for the material data to update. Since this is the last step in Osoyoos select All as the import option. Ensure that the asset type is set to model and that the Crate output is selected at a mimimum.
Hit Import. Osooyos will now create new GR2s, add references to these GR2s in the sidecar, and then import the asset into the game.
Open Foundation and navigate to your box. You should have the following tags at a mimimum: box.crate, box.model, box.render_
model, box.physics_ model, box.collision_ model. Load into either Tag Test or Sapien and place you new asset down. If imported correctly you will have a a green box that has collision and physics.
Example - Importing a Scenario into Reach
TODO